This post is part of a larger series on how I designed my photography zine, in somewhat agonizing detail. Take a look at the other posts in this series:
- Part I of VI: Forming the Project
- Part II of VI: Early Design Concepts
- Part III of VI: The Design Dirty Work
- Part IV of VI: Editing the Zine
- Part V of VI: Producing the Zine
- Part VI of VI: How to Photograph a Laundromat & Other Thoughts
Sitting down to assemble the zines is both the best and worst part of the process of making my zine. On one hand, I enjoyed the intricacies of determining the steps I needed to follow to ensure my zine looked nice, but also replicable. It also felt the most like progress in what was starting to feel like a personal odyssey towards finishing what I’d started. And the tactile part is what I like best: working with my hands and relying on muscle memory for skills I’ve built over the years.
However, it tested my patience and forced me to troubleshoot countless details since things don’t always work out the way you plan. And in some ways, making the zines physically hurt in the way small, repetitive tasks are wont to do. (Don’t worry, I took plenty of breaks, stretched my hands/wrists, and stopped when it felt like I needed to.)
This post is likely to be the most useless and useful part of this series for anyone trying to follow the way I made my zine. Either way, this is how I actually made my zines.
Materials
A long, exhausting but not exhaustive, list of everything I used to make my zines:
Consumables:
- 80 lb. cream colored cardstock
- 32 lb. HP Premium letter sized printer paper
- 11″ x 14″ cotton paper, white
- Vellum paper
- Lots and lots of printer ink (off-brand, because I am not a billionaire)
- White waxed linen thread
- Golden metallic sharpie/marker
- Sealable cellophane pouch for packaging
Good beverage (optional, but preferred)
Tools:
- Printer: Epson X7100
- Needle awl
- Needle (preferably one with a dull tip and a large eye)
- Snippy scissors
- Bone folder (optional)
- Ruler
- Craft knife
- Cutting mat
- Guillotine cutter (definitely optional, but nice if you have access to one)
Patience (optional, but preferred)Good music/audiobook/podcast (optional, but preferred)
Step 1: Printing
Shockingly, this was the longest part of the process.
Printing the Covers
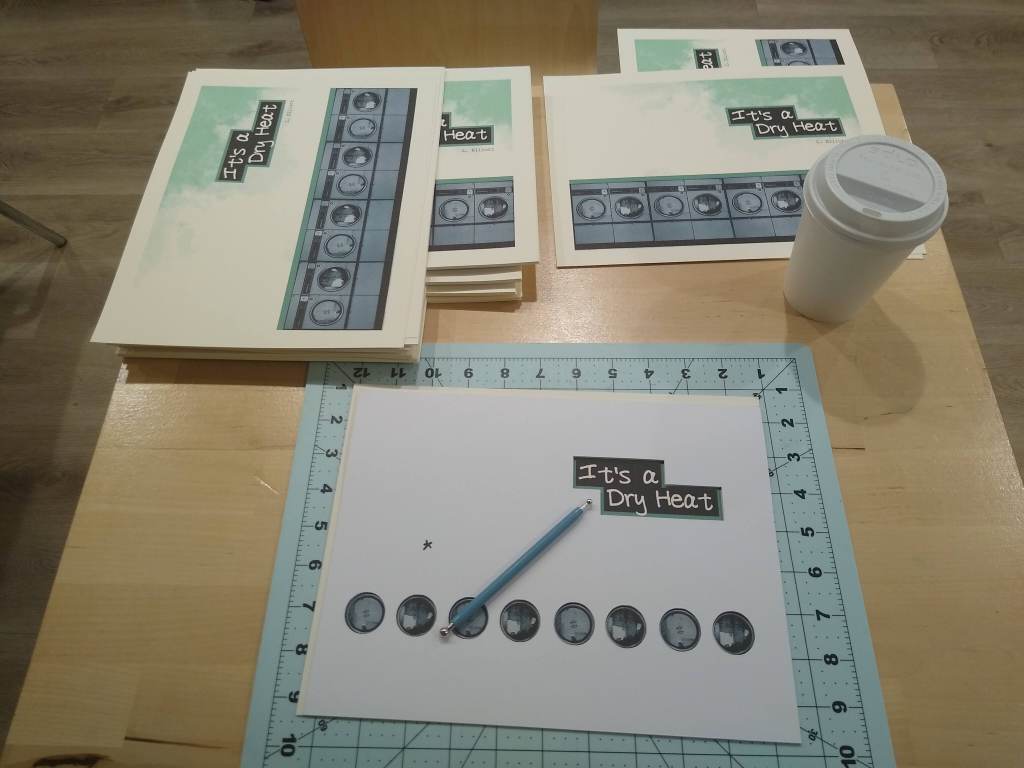
I took an active roll in printing the covers since this felt like the most vulnerable part of the process. While my printer has a duplex printing feature (meaning it automatically prints on both sides of the paper without having to flip it), it does not perform that function well with the 80 lb. cream colored cardstock I chose. Because of this, I printed the exterior facing side first, followed by the interior face of the cover. I printed the document from Adobe Acrobat Reader, instructing the printer to print to Actual Size and standard print quality, using colored ink for the exterior and black ink only for the cover interior.
Printing the Centerfold Insert
The dimensions of this centerfold demanded the paper be larger than letter size, so I settled on using some legal sized (11″ x 14″) cotton paper I found at a thrift store several years ago. Printing this section was proved equally difficult, and I had to print each side individually. I also printed this document from Adobe Acrobat Reader, instructing the printer to print at the Actual Size using black ink only and a standard print quality. Once they were all printed, I also trimmed the paper to the same size as the printed content on the page since it was a little smaller than the paper. I did this with a ruler and sharp craft knife over a cutting mat.
Printing the Interior Pages
This part took forever. If I could go back and change anything with how I produced my zine, I may have sent this portion out to a print shop simply due to the time and ink I went through. I printed this document from Adobe Acrobat Reader at standard size, as well, though I went with a high print quality and adjusted the print density. From there, I was a slave to my printer, merely letting it go and feeding it with more paper or ink every time it beeped at me. It was easy, if not mind-numbing. It also took several to print 29 copies between my day job and sleep.
Step 2: Readying the Troops – Embossing Details and the Centerfold Insert
Cover Embossing – Hand & Heat
These features feel like the most unique features of my zine, and possibly the details I am most proud of.
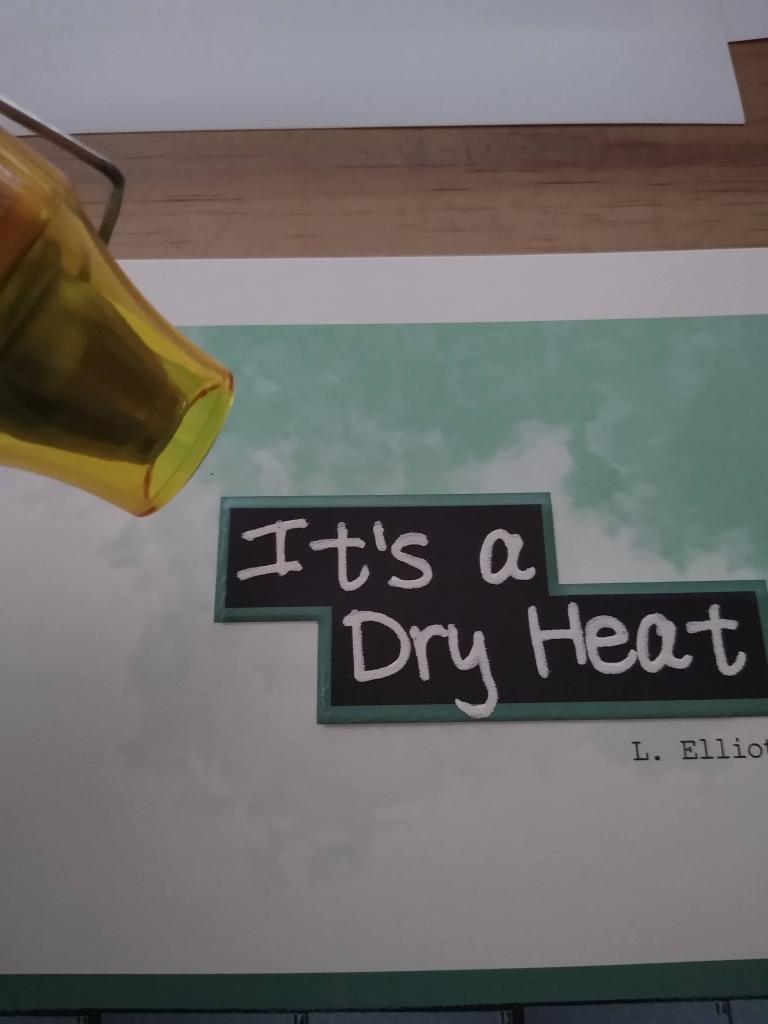
- Heat Embossing: After I finished printing both sides of my covers, I spent an afternoon heat embossing the title. I traced over the title with a clear embossing marker before sprinkling white embossing powder onto the cover and gently tapping it on my work surface to remove any extra powder, like when you work with glitter. Finally, I used a heat gun to set the embossed design. (extra tip: I found that wiping the cardstock with a dryer sheet before adding ink or embossing helps.)
- Hand Embossing: I used this technique I used to make raised parts on my cover, which are delightfully tactile. To do this, I made stencils to guide my embossing tool by bringing my cover design into Cricut Design Space and making a file to cut out the parts I wanted to highlight. I cut out the guide two times from the thickest cardstock I could find. During the embossing process, I placed the cover between the two stencils. One stencil helped me figure out where to emboss, and the other one slightly lifted the cover off my cutting mat, creating space for the cover’s paper fibers to be pressed into.

The Center Insert Map Overlay
I really wanted to make a translucent overlay over a map showing the location of each laundromat I visited because I am such a sucker for a map. I chose vellum paper for this because it is see-through but sturdy. I experimented with several methods of getting my laundromat information on the vellum, including printing and heat embossing. Neither of those worked well. In the end, I chose to write the overlay title and marking each location by hand using a gold metallic marker and tracing over a template I’d made.
Step 3: Binding
My zine has two bound edges: one binding the map overlay into the middle insert, and one binding the entire zine together. I bound both edges using a classic saddle stitch: first the middle insert edge, then the whole zine together.
I first folded everything, and made sewing stations (a.k.a., I poked holes) in the folded edges using a template and a needle awl atop a cutting mat. Finally, I sewed everything together with white, waxed linen thread using a blunt needle with a fairly large eye to make everything easier.
Step 4: Trimming
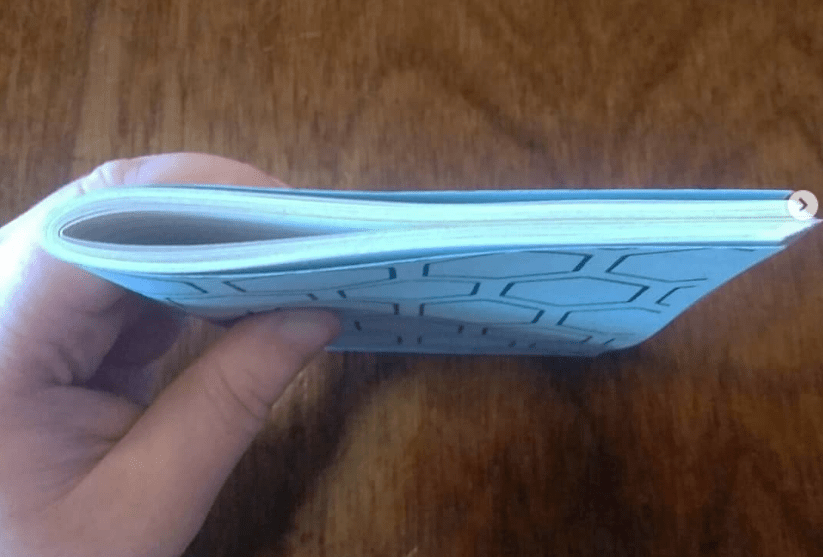
Folding a stack of pages in half and binding them using saddle stitching (and most binding methods) creates a phenomenon called page creep. This happens because each sheet of paper takes up space, pushing each half-folded sheet of paper gradually forward. As a result, a small triangle of papers forms on the edge opposite of the binding, just like the right edge of the photo.
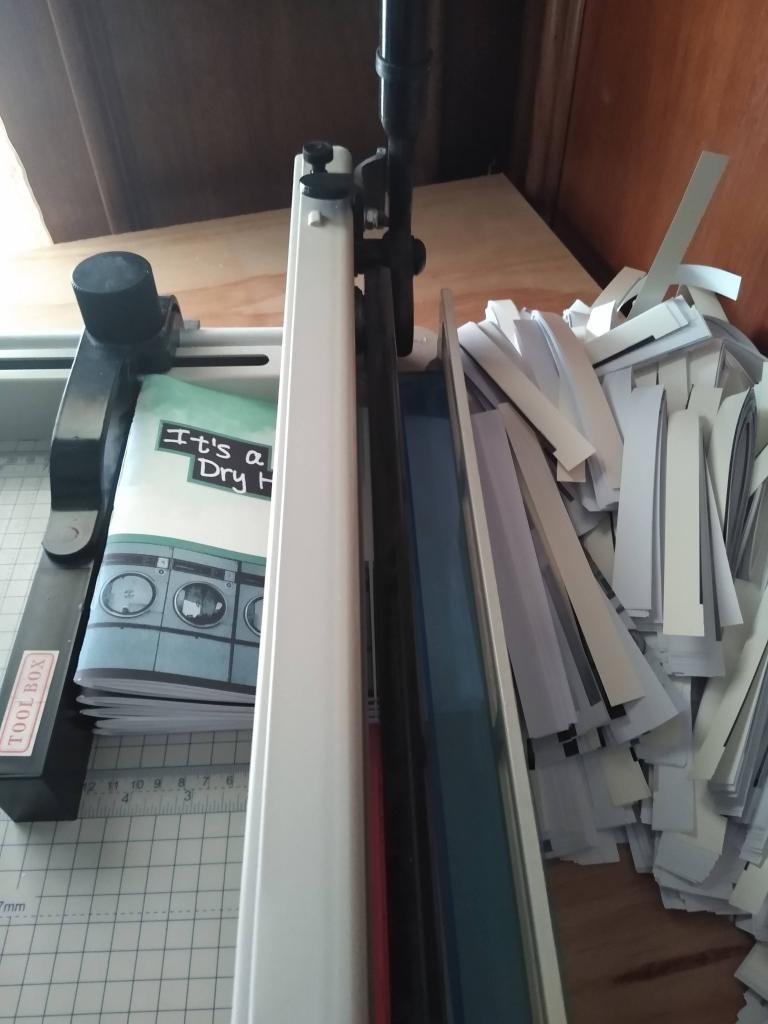
The most common way of fixing this is to simply trim the edge flush. Once cut, the edge is so smooth and gratifying. Bookbinders use a variety of methods to do this, from something as simple as a ruler and a craft blade, to a formal bookbinding plough. I happen to use a guillotine paper cutter, which is good for cutting down into a large stack of paper at one time. (His name is Gil the Guillotine Cutter).
Step 5: Packaging
The idea of packaging my zine in a resealable cellophane sleeve started when I happened to find some clear, cellophane pouches for sale at a dollar store in Victoria, BC while I was on vacation. I bought two packages of them for $2 CAD each, and was pleased to see they were the perfect size for my zine.
Once I got closer to releasing my zine, I also realized I wanted to create some “merch” to go with my zine, and settled on creating a limited edition of darkroom printed postcards of laundromat photos to include with each issue, along with a couple stickers. The cellophane pouch ended up being useful because it allowed me to package everything together and not worry about any of my zines getting damaged.
Plus, it was just really gratifying to see them all nicely packaged.
